Showing posts with label Internet Cafe. Show all posts

How to install and configure Cafesuite client software on the workstations

I created this tutorial because someone message me, asking how to configure and install the cafesuite client ?. This is the proper way to install it on workstation.. You need to setup and configure or make your own client installer first.

 What should I do to configure client software?

Configuring client program should normally be done before installing it on client PCs.

First please go to main settings (menu Program/Options) and on Main/Connection page select correct server address. This should either be a main computer hostname or a fixed IP from local network.
TIPS: Make your server LAN STATIC ,para maiwasan yung pag change ng IP ng server.


Then use the Client setup command from the Program menu in CafeStation to open client software configuration window.
  1.         Make sure that the server address is correct - otherwise just click Update from server connection settings.
  2.         Set password which will protect client software from unauthorized uninstallation. Click the Set password to protect client software button to enter it. You'll be asked for this password when trying to uninstall client software from the workstation.
  3.         If you don't set the password, you'll be asked to do it after you press OK to save client configuration.
  4.         If you are going to use workstation lock, you should configure it on the Workstation lock page and the Lock look page. Check also all remaining pages and set relevant options for your cafe. You can read description of most settings by pressing F1 key.
  5.         Click the OK button to save client program configuration. Client configuration is saved in the Client directory in the application data folder (you can find a shortcut to Client folder in CafeSuite Start menu group). We recommend sharing this folder over network (read only) to make installation easier and quicker. The recent versions of CafeSuite can automatically share this folder for you.


NOTE: Recent versions of CafeSuite offer possibility of saving separate client configuration for each workstation group. You can select configuration template from the liston the bottom of the client setup window and use disk icon next to it to save configuration template. Configuration templates with name corresponding to workstation group define settings for all computers belonging to this group.


How to install client software on the workstations?

Remember to configure client software before installing it on the workstations. See topic: What should I do to configure client software?

Installing client software, after it's configured, is very easy:

YOUR CLIENT FOUND ON PROGRAMDATA FOR WINDOWS 7 USER


  1.         Log onto the client workstation as user with administrative access rights to the system (so that it is possible to install the software in the system).
  2.         Execute CafeAgentSetup.exe program from the shared CafeSuite\Client folder from the server PC or from where this folder was copied to (e.g. pendrive). Using network share is recommended for quickest installation, but it requires sharing files to be allowed on your network. In order to locate shared Client folder you should browse to the My computers/Network neighbourhood, open main PC, open Client folder and double click on CafeAgentSetup.exe. Please note that your Windows might not show file extensions - in this case just doubleclick on file named CafeAgentSetup.
  3.         It might be necessary to restart computer to install driver for disk restrictions. The program will ask you whether to restart now.
  4.         After installation computer will normally display lock screen with login window (if enabled) and show CafeAgent hourglass icon in the system tray.
  5.         Once CafeAgent is running on client PC, it automatically tries to connect to CafeStation running on the server PC (using the server address provided in client setup). CafeStation should ask you to confirm adding new workstation to the list (or add it automatically).
  6.         Please repeat this procedure for each of your client computers.


Important: Do not install client software on the main computer used by operators! siyempre server yun hahaha!

Website: http://cafesuite.net/


MyHotspot - Turn your Laptop or PC to a Hotspot with Login Portal

MyHotspot- Wireless-LAN for Hotels and Cafés!
Give your customers the flexibility and extra mobility with Wireless Internet Access
MyHotspot is a professional Wireless LAN software solution for providing internet access to your customers. Customers will be redirected to your login page to authenticate with user account or a prepaid-code before getting the Internet access. The PayPal payment option allows your customers to create and pay for network access directly. The software controls download, upload, data transfer, time usage, visited pages. MyHotSpot Billing software runs on your Windows PC, controls unlimited user or prepaid-code accounts, and displays data to customers on your self-branded pages.
MyHotspot billing software is the definitive tool for managing your public WIFI-HotSpot in internet cafes, shools, hotels, bistros or gaming cafe / game center.


How it works this Hotspot system?

Login page 

When a customer connects to your network and type any website address, login page will be displayed in browser and prompted to authenticate with user or code-account


Mobile login page 

MyHotspot is specifically designed for use on mobile devices (e.g Smartphones,Tabletts). MyHotspot detect if the customer is on a mobile or desktop device and then redirect them to the appropriate website version.


Error dialog 

The Error dialog will be automatically displayed by entering a invalid data, expired or disabled account.


Free Websites and Free Access 

MyHotspot software gives you ability to specify free Websites your users will be able to open without authentication.


Your customer get a free internet access by login with their social account. Default Free Time 1 hour.


Successful Login 

If the customer entered correct details, login would be granted. Infobox is useful as it keeps a customer informed about the current balance an remaining time.


Installation WLAN  to WLAN2 adhoc (192.168.137.1)


WLAN or LAN1 TO LAN2 (192.168.137.1) Router (192.168.137.2) must be disabled DHCP


1. Download MyHotSpot  and install it, a reboot is required. Make sure your WiFi hotspot is running after the restart.
(Skip ads in 5 seconds)
http://goo.gl/forms/jF3dfC89CF


Software installation:

  • Please make sure to remove the program SKYPE "skype.exe" from your computer. this program use the port 80. Hindi Kasi Mag wowork yung Portal
  • Start the setup file on your windows PC to Install Myhotspot software.
  • The Internet Connection Sharing (ICS) must be enabled During the installation process. The network wizard will be launched.
  • You must restart your computer after installing MyHotspot.
  • If you use Windows Vista/7/8/10 make sure to run MyHotspot with administrator rights. Right click on the program, and click on "Run as administrator".


2. Launch the program and at the Network Configuration window, make sure Automatic is selected and choose the adapter that connects to the internet at the top drop down menu and the hotspot below. Click Next.

Hardware installation:
  • Connect the first network card (LAN1) or the USB surf stick to the Internet and make sure that the Internet connection is working on your computer, and the IP assigned to this network card is not "192.168.0.x" and not "192.168.137.x".
  • Connect the second network card (LAN2) to LAN port (not to WAN port) of your wireless access point or wireless router.
    (Example: NETGEAR-WLAN-Router)
  • Configuration of the Wireless Access Point:
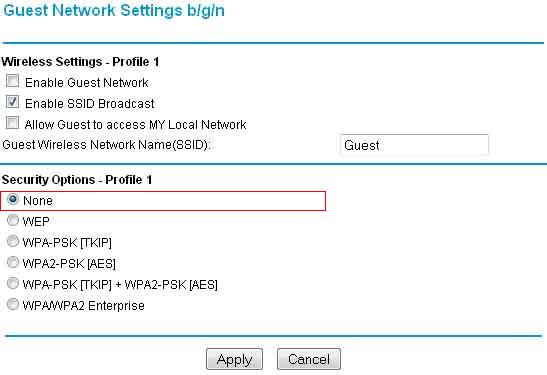
    • Disable by default the wireless security for your router or access point. You can Optionally encrypt the access to your Wireless Router or Access Point.
      (Example: NETGEAR-WLAN-Router)
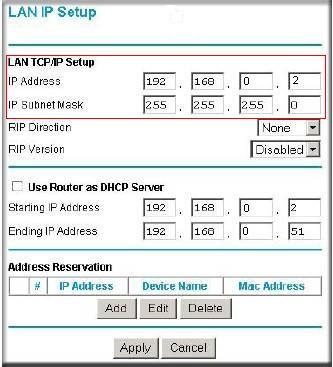
    • You will also have to specify a static IP addresse of the LAN port of your Wireless access point.You'll need to http in to your access point and assign the new IP address "192.168.0.2" by XP/Vista or "192.168.137.2" by Win7/8/10.
      (Example: NETGEAR-WLAN-Router)
    • Subnet mask: 255.255.255.0
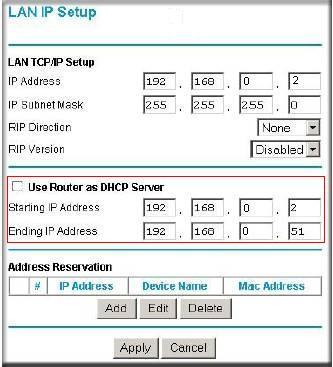
    • If you use a wireless router make sure to disable DHCP-Server. You'll need to http in to your wireless router and manually disable the DHCP-Server.
      (Example: NETGEAR-WLAN-Router)

Importanti dito is yung  Source ng Internet ay hindi 192.168.0.1 or 192.168.137.1 , dahil sa ICS  yung taga bato dapat ng internet ang siyang  may IP   192.168.137.1 example dito is yung adhoc or WLAN2 192.168.137.1 siya. WLAN naman is naka konek sa modem kong SmartBro kaya 192.168.15.7 siya.


Check This post how to Create Adhoc and about ICS
http://www.gadget-technolog.blogspot.com/2015/05/how-to-create-wireless-ad-hochotspot-on.html


Shared  over LAN , from WLAN to LAN

ROUTER SETTING  DISABLED DHCP SERVER
 (KASI PAG NAKA ON YUNG DCHP SERVER WALA KA CONTROL DI NAGANA YUNG REDIRECT SA LOGIN PORTAL KAYA NAKAKA BROWSE AGAD YUNG CLIENT )


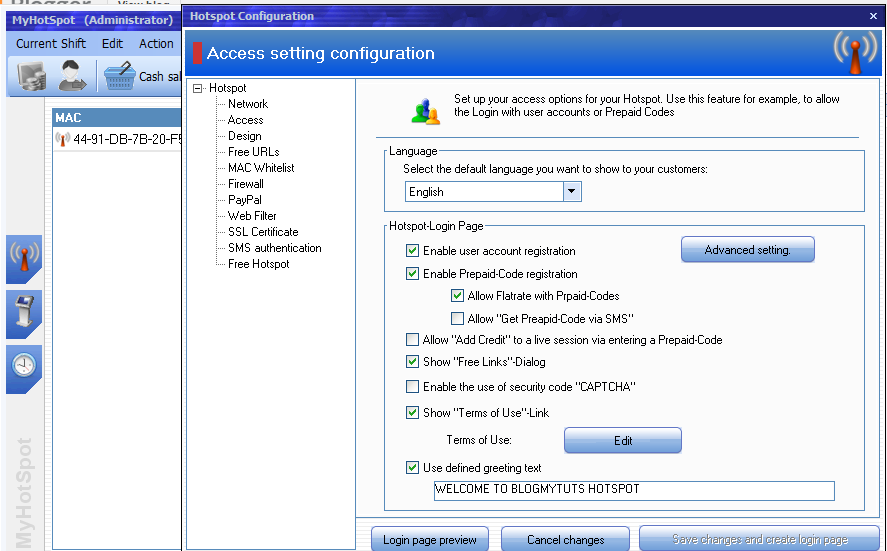
4. Here, we’re going to enable a simple test login to verify the connection works. Click on the Edit menu -> Hotspot Configuration -> Access, then click the blue Advanced setting button. Tick “Enable guest-login”, adding a password is optional, click Close.


5. Like the previous hotspot software you need to now go to a device which can connect to the hotspot, such as another computer or tablet, connect to it , and then try to open a webpage. You should be greeted with the MyHotspot default login page…  or Type on your browser this IP address 192.168.137.1


Management 

MyHotspot provides you with a table overview containing all internet sessions on you WIFI-Hotspot. You can use this manager to end a internet session.


Pricing  Go to Edit Tariff and security  Change the Value like on this image. Just edit the Defaults.


Create Prepaid Code


Hotspot Configuration

Here you can customize your login portal page set Free Website Free Login via social network  and Firewall etc..

MyHotSpot is setup to work with tariffs and payments which is fine if that’s what you want, more problematic if you just want to use access logins for time or bandwidth usage. What you will need to do is go to Edit -> “Tariffs and Security” and set all tariff rate options to zero money and then create a user from there. Once set correctly, it does work quite well. The icons down the left of the main window will show the log and information about who’s connected and duration/traffic used.


Server Configuration

wala naman masiyadong gagalawin dito  yung currency Php or  printer lang..

On Firewall you can Block any port Example Clash of Clan TCP port 9339  then Disable it.


NOTE: If the Login Page is not working it means you have programs already using port 80, I suggest use a newly reformat PC or Laptops if you want to use this..


You may also want to read:

Globe myBusiness WiFi HOTSPOT With Ticketing Bill System

How To Create Wireless ad hoc/Hotspot on your Laptop without any Software on Windows


Supported searches :
◾Free Hotspot
◾Free WiFi Hotspot


How to Set Custom Rate and Vouchers on Cafesuite

You can set up charging rates on the Charging rates page in the CafeStation configuration.

There are two types of rates:
▪    Standard - normal charging rate that can use periodic discounts.
▪    Periodic - used as sub-rates to define periodic discounts.
Charging rates can be assigned to computer groups and customer accounts. Use the Set default rates command from the List menu to assign charging rate to a workstaiton group.
When a workstation is active, the currently used charging rate is displayed in the rates drop down list in the main window and in the Time information window. You can change it dynamically by selecting another one from the drop-down list.
Approaches to charging rates configuration
There are several approaches to constructing charging rates.

Most of our customers set charges for individual time periods, like:
▪    5 min. — $0.25
▪    10 min. — $0.40
▪    30 min. — $0.50
▪    1 h. — $0.80
It's also common to set prices per minute to get exact charges:
▪    1 min. — $0.01, min. time — 0 min.
▪    1 min. — $0.08, min. time — 1h
▪    1 min. — $0.06, min. time — 4h

Notice how the Minimum time setting can be used offer better prices for customers who purchase long periods of time.

It may be also sufficient to define just one price for hour or minute if prices in your cafe are fixed no matter how much time is used.
There are many more possible combinations, feel free to experiment a bit with different settings to find ones best for you.

It should be noted that the software will not be able to calculate charges for time periods that are not defined. For example, if you define prices for 1h and 3h periods only and your customer uses 15 minutes, the charge calculated by the software will be the same as for using one hour.


How to Set Custom Rate :

 
1. Click the Program Menu , then  Click Option.


2. Click the Money logo  Change your Currency ( example: Php ) ,then click Charges Rate finally click add button.


 3. Name your Price Rate  then  click  Add  to Create  Price Rate  and Amount of Time  according to your Promos. Click OK when Done.

4.  Now Assigned Default Charging  Rates ,choose the one you created .


And your Done Ready to Operate :)


The unused Charges Delete them ...


How to Create Vouchers

 This is optional if you want to sell vouchers  with user name and password. Can be use as Promo for your customers

1.Click on Account then click Generators


2. Fallow the sample on the Picture.
User Name Prefix
Length: Any
Count or number of Generated Account.
Type : Time Account
Group: any name you want
Total time:  How many hours you want.
Rates : Charge Rate you Created.
Account Template: Any Name you want  and then  click SAVE.


 Click GENERATE  and then Print your Voucher


Account Validity is Optional If you want Expiration and Limit daily usage.

LINK ABOUT Cafe Suite http://www.gadget-technolog.blogspot.com/2015/05/cafesuite-3700-free.html

You Can Also Set WiFi Hotspot
http://cafesuite.net/faq/index.php?action=artikel&cat=7&id=151&artlang=en


Cafesuite 3.70.0 Free

CafeSuite is powerful Cyber Cafe management software that helps with managing customers and employees, controlling computers and printers, securing systems, accounting and billing. It simplifies and automates running ythis Internet Cafe business. Unlike many other competitive programs, CafeSuite is robust, quick, secure and very intuitive and easy to use. It doesn't matter how big ythis Internet cafe is - CafeSuite is capable of controlling any number of workstations. CafeSuite is designed to be a complete solution for Internet cafes and to make life easier for Internet cafe owners, operators and customers.

CafeSuite 3.70.0 2014-05-13

  • bandwidth control works on 64-bit Windows
  • process control works on 64-bit Windows
  • fixed adding new accounts through web requests
  • fixed crashing of CafeStation when printing is accepted after logs off
  • fixed asking to confirm sharing account
  • showing progress bars for lengthy operations in CafeStation

The package constsists of two applications:

CafeStation

a main program installed at the operator desk. It is used by operators to control all connected client workstations.

CafeAgent

installed on all client workstations - it secures and locks the system, offers possibility to log in and out and shows session information.


The basic task of this software is to provide operators and customers with an accurate timing and billing information at any time. CafeSuite keeps customer accounts, so that customers can log in on their own using username and password, printed account ticket with a timecode or even a magnetic card. It is possible to set any pricing you might imagine including periodic discounts on specific days or times, traffic and group discounts, time bonuses or points system. The software keeps inventory of products and services and supports POS devices such as receipt printers, barcode scanners and vending machines. Other important features include reservations, print control, remote screen and instant recovery of disk partitions. The software generates various statistics, which give detailed information about business performance. All transactions and actions are recorded into a database and can be viewed through multiple reports. Reports can also be delivered by e-mail.

What should I do to configure client software?

ALSO READ: http://www.gadget-technolog.blogspot.com/2015/05/how-to-set-custom-rate-and-vouchers-on.html

CafeSuite Software
http://j.gs/5nM9

Patch
http://j.gs/5nMB


Globe myBusiness WiFi HOTSPOT With Ticketing Bill System

Most people need Wi-Fi access for their works, researches and communications. Therefore, the WG-500P offers you a robust and secure hotspot solution which is just perfect for the mini size venues such as café/ airport lounge/ store or shop. The WG-500P provide customizable billing profiles and internet access with time limit control which is based on our billing management.

Get the myBusiness WiFi Hub with a Fixed Internet Plan for only P1899/month, or as an add-on to your existing plan for only P299/month. Enjoy a WiFi Hub Device with up to 5Mbps DSL connection and Landline with unli calls to Globe/TM and Globe Landline.


http://mybusiness.globe.com.ph/wifihubinquire?gclid=CP2V7NWvrMUCFVglvQod_LUAew


WG-500P | Hotspot in a Printer

Wireless Subscriber Gateway with built-in thermal printer to generate user's account for Internet access and is perfect for small venue owners.Last year I already post about this device by AGN SOLUTION


LEARN MORE ABOUT THIS WG-500P DEVICE 


http://www.gadget-technolog.blogspot.com/2014/08/wg-500p-hotspot-in-printer-by-agn.html


You mas also want to read:


Kerio Connect Load Balancing and Complete Firewall Software

Kerio Connect, formerly Kerio Mail Server, is a super-fast secure multiple domain mail server working with all POP3 and IMAP desktop mail clients for Windows, Linux and Mac. Kerio Connect comes with a powerful Web mail application to allow users to access email anywhere, comprehensive mobile device support, bundled McAfee AV protection, backup and archiving capabilities and much more.


Features

Cross-platform Collaboration

    Manage email and calendars using Microsoft Outlook
    Manage all groupware features from Internet Explorer, Safari or Firefox using the powerful Kerio WebMail web application
    Manage all groupware features using Microsoft Entourage on a Mac
    Natively support Apple iCal and Apple Address Book through CalDAV and CardDAV


Mobile Synchronisation

    Push email, calendars, contacts and tasks on to your user?s mobile devices
    Respond to meeting requests; send emails and more from your mobile device
    Delete data on your mobile device remotely using 'Smart Wipe' technology in the event that your mobile device is stolen or lost
    Kerio Connect supports a wide number of mobile devices including the Apple iPhone, Windows Mobile, Treo Palm, Blackberry, Symbian and Android devices (features vary per device model)

Advanced Security

    Block up to 98% of spam emails, comes with over 14 layers of spam protection including Directory Harvest Attack protection, SpamAssassin, anti-phishing and anti-spoofing, real-time blacklist servers, custom whitelists and blacklists, redirect Block list website, SMTP restrictions and more
    Up to 80% of spam can even be detected before it reaches the mail server, reducing resource requirements
    Integrated anti-virus protection from McAfee detects viruses in email attachments; even combine McAfee with a second virus engine of your choice for extra protection (plugin support for ClamAV, AVG, NOD32, Sophos and Avast)
 Autobalancing


Archiving Capabilities

    Archive all emails - local, incoming, outgoing and relayed, then search and sort through archives to ensure compliancy with corporate security policies

Automated Backup

    Schedule full backups and differential backups (backup only changed data) without stopping the mail server
    Restore user data and server configurations onto another Kerio Connect server
    Recover user's emptied deleted items with just a few clicks

Powerful Administration

    Install and setup in minutes
    Web based, graphical and intuitive administration for all settings, administer remotely through a secure channel
    Completely self contained functionality - does not depend on other SMTP, POP, IMAP, LDAP or HTTP services or applications
    Distributed Domain functionality enables administrators to manage a single email domain across multiple servers in separate locations.

 Redirect blocklist


I'm not providing crack version here but you can search  Kerio Winroute or Kerio Connect crack on Google or youtube.

How to setup:

1. Server PC with two LAN card...
a: Installation instruction
  •  LAN CARD#1  plug in modem or router  ISP.
  •  LAN CARD#2 plug hub or switch.


Older Post ►
 

Copyright 2011 Gadgets Technology is proudly powered by blogger.com