Showing posts with label Networking. Show all posts

Wireless Network the Weakest Security Link in Enterprise IT Infrastructure

Pasig City, Philippines – June 13, 2015–Information Technology decision makers (ITDMs) believe wireless networks to be the most vulnerable element of the IT infrastructure, according to a new survey from Fortinet® (NASDAQ: FTNT), the global leader in high-performance cyber security solutions. Nearly half (49%) of respondents ranked wireless networks as most exposed from a security standpoint, in contrast to just 29% for the core network.

The Fortinet survey also reveals that insufficient wireless security is a concern for almost all (92%) of the CIOs polled; hardly surprising given that more than one-third of the enterprise wireless networks put in place for internal employees, do not have the basic security function of authentication in place.

The findings come from an independent survey of over 1,490 IT decision makers at 250+employee organizations around the world. All respondents were sourced from independent market research company Light speed GMI’s online panel. 


Other survey highlights include:

o   Nearly half of ITDMs (48%) consider loss of sensitive corporate and/or customer data the biggest risk of operating an unsecured wireless environment.

o   72% have adopted a cloud approach to management of their wireless infrastructure and 88% trust the cloud for future wireless deployment.

o   43% of ITDMs polled provide guest access on their corporate wireless networks; 13% of these organizationsdo so without any controls whatsoever.


Wireless Networks at Risk

According to the survey, wireless networks are ranked as the most vulnerable IT infrastructure, with the highest proportion of ITDMs (49%) placing it in their top two. Respondents positioned wireless as significantly more vulnerable than core networking infrastructure, with just 29% of ITDMs ranking this highly. Databases (25%), applications (17%) and storage (11%) infrastructures were considered amongst the least susceptible from a security standpoint.


In addition, 37% of global ITDMs polled do not have the most basic wireless security measure of authentication in place. A significant 29% and 39% of enterprises respectively, overlook firewall and anti-virus security functions when it comes to wireless strategies.

Other security measures deemed critical to core infrastructure protection, such as IPS (deployed by 41%), application control (37%) and URL filtering (29%), play a part in even fewer wireless deployments.


When considering the future direction of their wireless security strategies, the majority of respondents said they would maintain focus on the most common security features – firewall& authentication, while demand for more security is emerging with 23%prioritizingcomplementary technologies – IPS, anti-virus, application control and URL filtering - to guard against the full extent of the threat landscape.


Concern High over Insufficient Wireless Security

Of the ITDMs surveyed, 83%are concerned their existing wireless security is not sufficient, with CIOs reporting the highest level of concern at 92%.Despite deploying the highest level of security of all the regions surveyed, ITDMs across APAC are the most concerned about their wireless security with 44% stating they are very concerned, in contrast to 30% in the Americas, and 20% in EMEA.

Globally, ITDMs reported varying confidence levels in wireless security; China tops the board with 71% ‘very concerned’, compared to just 13% in Japan.

The findings suggest that increased security awareness leads to higher levels of concern, with respondents in the top two ‘concerned’ countries - China and India – deploying more wireless security functions on average, than the two least ‘concerned ‘countries – Italy and Japan.


Risk of Data Loss Tops Poll

When asked to cite the risks of operating an unsecured wireless network, 48% of ITDMs considered loss of sensitive corporate and/or customer data as the biggest risk to their organization. This was highest at 56% in APAC, in contrast to the Americas at 45% and EMEA 42%.

The next highest risk, industrial espionage, was cited by just 22% of ITDMs, followed by non-compliance to industry regulations (13%), with service interruption and damage to corporate reputation ranked equal last (9%).


Cloud Management Becomes the Norm

Wireless infrastructure governed by a premise-based controller is a thing of the past according to the findings, with on-site wireless controllers the least common form of management (28%).

This trend for cloud-based management looks set to grow further, with only 12% of enterprise ITDMs refusing to trust the cloud for such critical management in the future.

Of thecloud-readyrespondents, 58% would want to use a private cloud infrastructure for wireless management and 42% would outsource to a third party managed services provider. 14% of those considering outsourcing would only do so provided it is hosted in the same country, leaving 28% happy to embrace wireless management as a public cloud service regardless of geography.


‘Totally Open’ Guest Access

Nearly half (43%) of ITDMs polled provide guest access on their corporate wireless networks, with 13% of these organizations doing so without any controls whatsoever.

The most common form of guest security access on corporate wireless networks is a unique and temporary username and password (46%), ahead of a captive portal with credentials (36%).

“The survey findings indicate that despite the growth in mobility strategies, wireless security has simply not been a priority for enterprises to date,” said John Maddison, vice president of marketing products at Fortinet. “As advanced persistent attacks increasingly target multiple entry points, and the cloud becomes more prevalent, it’s not an oversight organizations should risk any longer.”


“It’s positive to see IT Leaders beginning to recognize the role wireless security plays in protecting their critical business assets, yet there is more to be done. As IT strives to balance the need for strong network security with ubiquitous connectivity, wireless must be considered as part of a holistic security strategy to ensure broad and consistent protection for users and devices over wired and wireless access.”

You may also want to read:
Philippines Internet Service Provider Wimax and ADSL Router Modem Vulnerable to Remote Hacking


The Fortinet Wireless Security Survey was a research exercise undertaken throughout May 2015, bymarket research company Lightspeed GMI. The survey was conducted online amongst 1,490 qualified IT decision makers – predominantly CIOs, CTOs, IT Directors and Heads of IT – at organizations with more than 250 employees around the globe. 


12 countries participated in the survey: Australia, Canada, China, France, Germany, India, Italy, Japan, Hong Kong, Spain, UK and USA. For more information about LightSpeed GMI go to: http://www.lightspeedgmi.com


GSM Wireless Will Die in 2017

Carriers around the world are converging on 2017 as the year to turn off their GSM networks, with three operators in Singapore announcing Monday their plans to reuse their GSM spectrum for other services.

The end of GSM or the Wireless Dial Up version will free up more bandwidth for faster 3G and 4G network technologies—but will also force users of older connected devices that depend on GSM networks to upgrade or replace them.


On Monday Singaporean operators M1, Singtel and StarHub became the latest operators to set a timetable for turning off their GSM networks. They will do so on April 1, 2017, following in the footsteps of Telstra in Australia, which plans to do so by the end of 2016, and AT&T in the U.S, which will flip the switch on Jan. 1, 2017.

For many mobile phone users, the switch-off could pass almost unnoticed. Today, the majority of mobile customers have phones that also connect to 3G and 4G networks; only a small percentage of subscribers still use GSM-only phones, according to the Singaporean operators. When Telstra made its announcement last year, it said GSM accounted for less than 1 percent of the total traffic.

You may also like to read:

Evolution of Wireless Internet  and Review


The reasons for turning off GSM networks are technical and financial. Turning them off means the spectrum can be reused by more efficient 3G and 4G networks, which can use the same bandwidth to carry more data or serve more customers—and hence generate more revenue. Having one less network to manage should also result in lower costs for operators.

Upgrading the network will be worth it, though, according to AT&T. The higher speeds offered by 3G and 4G networks will enable enterprises to deliver better M2M applications. For example, video cameras for real-time streaming and driver dash cameras for fleet trucks will be possible.

Not all operators are as aggressive in their plans to turn off GSM. In general, European operators are being a bit more cautious. For French network operator Orange, there will no big switch off, according to Yves Bellego, director of Technical and Network Strategy at the French operator. Norwegian operator Telenor plans to turn off its 3G network in 2020, and its GSM network in 2025, it recently announced.

The reticence to make the move isn’t just down to wanting to support existing M2M devices. The European operators still have lucrative roaming businesses and could run into some regulatory issues if they decide to turn off GSM networks in the next couple of years, according to Hatton.

For me  Philippines is not ready to remove the old GSM  2G band ,LTE is  still young and limited area have LTE signal. According  to Asia’s mobile and broadband internet speeds ,The Philippines is stock on the slow lane with increase of 0.2mbps from 3.4Mbps to 3.6Mbps.


{source}


You may also like to read :


Run remote commands on a Cisco router from your PC Remote Shell (rsh)

Can you go to a Windows command prompt and run a command on your router? Usually, you would have to Telnet or SSH to the router first to run the command, right?

Did you know that you can run Cisco router commands without leaving the Windows command prompt? This can come in handy for scripting and automating router management.

While this approach works, you can also run router commands without leaving the Windows command prompt, which can come in handy for scripting and automating router management. Let's take a closer look.

What is remote shell (rsh)?

Remote shell (rsh) is a command-line program commonly found in UNIX and Linux systems. Using rsh, you can remotely execute command-line programs on a remote system. This could be another UNIX or Linux system, or it could be a Cisco router or switch. Rsh was part of the BSB UNIX operating system and included with rcp (remote copy) and rlogin (remote login).

While most Linux administrators are already familiar with rsh, some Windows administrators might not be. In fact, Windows XP and Windows Server 2003 both include rsh. Figure A shows a screenshot of using rsh at the command prompt.

Figure A

However, when working with rsh, it's important to remember that rsh is insecure -- it does not encrypt the communications between the remote device and the system. You should always configure rsh as securely as possible on the router by locking down the IP address of the management machine and the username.

However, even when taking such precautions, rsh is still very insecure compared to SSH. It's a good idea to use rsh only on a protected, secured, internal network. (By the way, if you're allowing rsh through a firewall, it uses TCP port 514.)

How do I configure rsh on my router?

To be able to run a command on a Windows PC, have it go to the router, execute the command, and then return the output to you, all you need to do is enter two commands. Let's walk through the process.

First, you need to enable the remote shell services on the router. The Cisco IOS calls the remote shell service ip rcmd. To enable this service, enter the following command when in Global Configuration Mode:
Router(config)# ip rcmd rsh-enable
Second, you need to configure the permissions for your workstation and your user to be able to perform these remote shell commands. Here's an example of this command:

Router(config)# ip rcmd remote-host root 192.168.1.45 ddavis enable
Let's take a closer look at this command. The ip rcmd remote-host part is required. Next, you enter the local username on this router of the user that the remote shell will log in under when it runs commands. In this case, we used the local user root. Next, 192.168.1.45 is the IP address of the management workstation that we want to allow to execute these remote shell commands -- in other words, the IP address of the PC. Next, you see my local Windows username: ddavis. In this case, that's the name of the user logged into the Windows XP machine as well as the user who will be executing the rsh command in Windows. If I were running a batch job script that executed the Windows rsh command, I would need to enter the Windows username of the user that the batch job was running under.
Finally, the command contains the enable keyword. This allows the remote shell user access to enable the mode on the router. I could take this a step further and specify the level of access allowed (i.e., levels 1 through 15).

Keep in mind that these two commands assume you already have the router configured and you already have a local user called root. If you don't have a root user, you can use the following command to do so:

Router(config)# username root privilege 15 password C1sCo!

How do I use rsh from my Windows workstation?

Once you've configured the above commands, you can easily run a remote shell command from the Windows command prompt. Figure B offers an example.

Figure B

Here's the actual command I used:

Z: rsh Router1 -l root sh ver

Here's how the command works:

The hostname is the first thing specified (in this case, Router1).
Next, I used -l (i.e., the letter L) to specify the remote username that I will use to log in. (Keep in mind that I still have to be user ddavis on the local Windows PC for the security to work. Also, I have to come from the IP address that I've specified -- in other words, this wouldn't work from another workstation.)
Finally, specify the command. In this case, I ran the show version command (or sh ver).
What can I do with the rsh command?
In addition to using the show version command, you can also run the show running-configuration (sh run) command or any other privileged level command. Here are some more examples:
show ip interface brief
show ip route
show ip ospf neighbors
show ip bgp summary
show log

What you can't do is run a Global Configuration Mode command, such as enabling an interface or configuring an IP address. This usually limits you to the show commands.

However, one very useful thing you could do is copy your current configuration to a TFTP server and do it inside a script initiated on the Windows server. For example, you would use the copy running-configuration tftp:/1.1.1.1 command.

What else can I do with remote commands?

If you check out the Cisco IOS documentation that covers remote commands, you'll find that there are a number of options you can use with the remote shell commands. One of the latest features in the Cisco IOS is that you can authenticate incoming rsh and rcp commands using a Cisco IOS access control list.

One of the more interesting variations is that you can use remote copy (rcp). So, I could copy a file using the Windows rcp command from my PC to the router or from the router to the PC -- without ever using TFTP or FTP. (You can enable rcp with the ip rcmd rcp-enable command.

Conclusion

The remote shell (rsh or rcmd) commands can be very useful for remotely administering your router. This is especially true if you want to create a Linux or Windows script that goes out to all routers on your network and performs some show command.


MyHotspot - Turn your Laptop or PC to a Hotspot with Login Portal

MyHotspot- Wireless-LAN for Hotels and Cafés!
Give your customers the flexibility and extra mobility with Wireless Internet Access
MyHotspot is a professional Wireless LAN software solution for providing internet access to your customers. Customers will be redirected to your login page to authenticate with user account or a prepaid-code before getting the Internet access. The PayPal payment option allows your customers to create and pay for network access directly. The software controls download, upload, data transfer, time usage, visited pages. MyHotSpot Billing software runs on your Windows PC, controls unlimited user or prepaid-code accounts, and displays data to customers on your self-branded pages.
MyHotspot billing software is the definitive tool for managing your public WIFI-HotSpot in internet cafes, shools, hotels, bistros or gaming cafe / game center.


How it works this Hotspot system?

Login page 

When a customer connects to your network and type any website address, login page will be displayed in browser and prompted to authenticate with user or code-account


Mobile login page 

MyHotspot is specifically designed for use on mobile devices (e.g Smartphones,Tabletts). MyHotspot detect if the customer is on a mobile or desktop device and then redirect them to the appropriate website version.


Error dialog 

The Error dialog will be automatically displayed by entering a invalid data, expired or disabled account.


Free Websites and Free Access 

MyHotspot software gives you ability to specify free Websites your users will be able to open without authentication.


Your customer get a free internet access by login with their social account. Default Free Time 1 hour.


Successful Login 

If the customer entered correct details, login would be granted. Infobox is useful as it keeps a customer informed about the current balance an remaining time.


Installation WLAN  to WLAN2 adhoc (192.168.137.1)


WLAN or LAN1 TO LAN2 (192.168.137.1) Router (192.168.137.2) must be disabled DHCP


1. Download MyHotSpot  and install it, a reboot is required. Make sure your WiFi hotspot is running after the restart.
(Skip ads in 5 seconds)
http://goo.gl/forms/jF3dfC89CF


Software installation:

  • Please make sure to remove the program SKYPE "skype.exe" from your computer. this program use the port 80. Hindi Kasi Mag wowork yung Portal
  • Start the setup file on your windows PC to Install Myhotspot software.
  • The Internet Connection Sharing (ICS) must be enabled During the installation process. The network wizard will be launched.
  • You must restart your computer after installing MyHotspot.
  • If you use Windows Vista/7/8/10 make sure to run MyHotspot with administrator rights. Right click on the program, and click on "Run as administrator".


2. Launch the program and at the Network Configuration window, make sure Automatic is selected and choose the adapter that connects to the internet at the top drop down menu and the hotspot below. Click Next.

Hardware installation:
  • Connect the first network card (LAN1) or the USB surf stick to the Internet and make sure that the Internet connection is working on your computer, and the IP assigned to this network card is not "192.168.0.x" and not "192.168.137.x".
  • Connect the second network card (LAN2) to LAN port (not to WAN port) of your wireless access point or wireless router.
    (Example: NETGEAR-WLAN-Router)
  • Configuration of the Wireless Access Point:
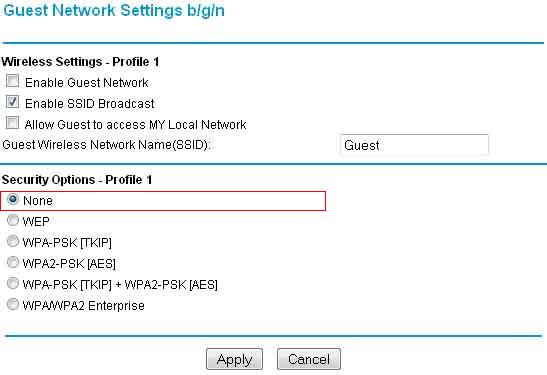
    • Disable by default the wireless security for your router or access point. You can Optionally encrypt the access to your Wireless Router or Access Point.
      (Example: NETGEAR-WLAN-Router)
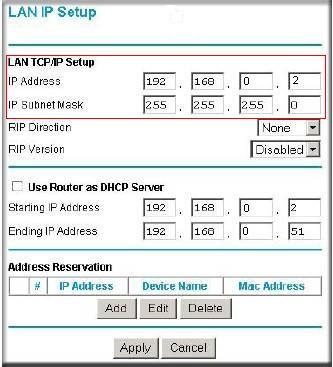
    • You will also have to specify a static IP addresse of the LAN port of your Wireless access point.You'll need to http in to your access point and assign the new IP address "192.168.0.2" by XP/Vista or "192.168.137.2" by Win7/8/10.
      (Example: NETGEAR-WLAN-Router)
    • Subnet mask: 255.255.255.0
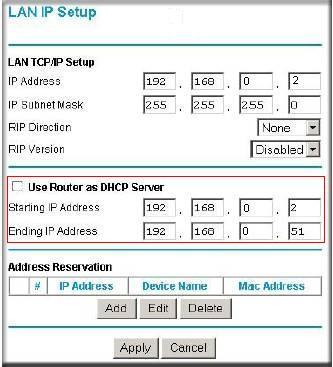
    • If you use a wireless router make sure to disable DHCP-Server. You'll need to http in to your wireless router and manually disable the DHCP-Server.
      (Example: NETGEAR-WLAN-Router)

Importanti dito is yung  Source ng Internet ay hindi 192.168.0.1 or 192.168.137.1 , dahil sa ICS  yung taga bato dapat ng internet ang siyang  may IP   192.168.137.1 example dito is yung adhoc or WLAN2 192.168.137.1 siya. WLAN naman is naka konek sa modem kong SmartBro kaya 192.168.15.7 siya.


Check This post how to Create Adhoc and about ICS
http://www.gadget-technolog.blogspot.com/2015/05/how-to-create-wireless-ad-hochotspot-on.html


Shared  over LAN , from WLAN to LAN

ROUTER SETTING  DISABLED DHCP SERVER
 (KASI PAG NAKA ON YUNG DCHP SERVER WALA KA CONTROL DI NAGANA YUNG REDIRECT SA LOGIN PORTAL KAYA NAKAKA BROWSE AGAD YUNG CLIENT )


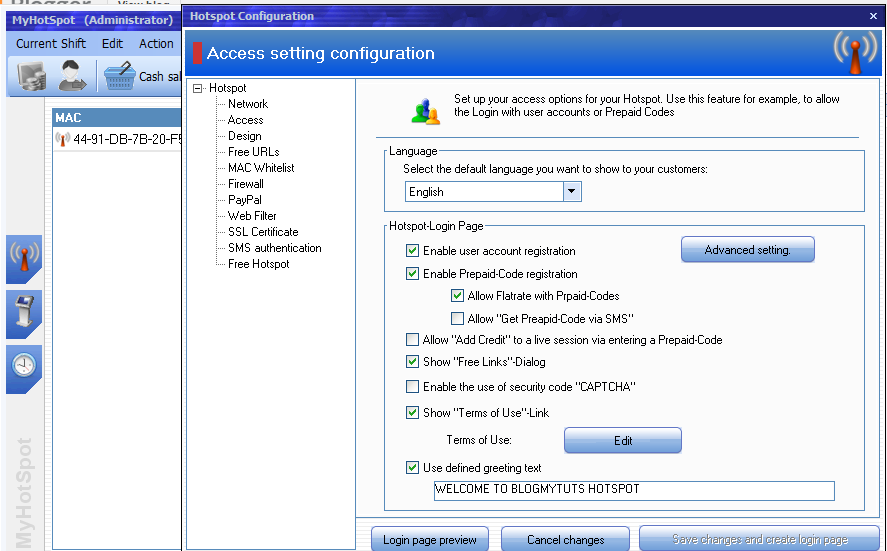
4. Here, we’re going to enable a simple test login to verify the connection works. Click on the Edit menu -> Hotspot Configuration -> Access, then click the blue Advanced setting button. Tick “Enable guest-login”, adding a password is optional, click Close.


5. Like the previous hotspot software you need to now go to a device which can connect to the hotspot, such as another computer or tablet, connect to it , and then try to open a webpage. You should be greeted with the MyHotspot default login page…  or Type on your browser this IP address 192.168.137.1


Management 

MyHotspot provides you with a table overview containing all internet sessions on you WIFI-Hotspot. You can use this manager to end a internet session.


Pricing  Go to Edit Tariff and security  Change the Value like on this image. Just edit the Defaults.


Create Prepaid Code


Hotspot Configuration

Here you can customize your login portal page set Free Website Free Login via social network  and Firewall etc..

MyHotSpot is setup to work with tariffs and payments which is fine if that’s what you want, more problematic if you just want to use access logins for time or bandwidth usage. What you will need to do is go to Edit -> “Tariffs and Security” and set all tariff rate options to zero money and then create a user from there. Once set correctly, it does work quite well. The icons down the left of the main window will show the log and information about who’s connected and duration/traffic used.


Server Configuration

wala naman masiyadong gagalawin dito  yung currency Php or  printer lang..

On Firewall you can Block any port Example Clash of Clan TCP port 9339  then Disable it.


NOTE: If the Login Page is not working it means you have programs already using port 80, I suggest use a newly reformat PC or Laptops if you want to use this..


You may also want to read:

Globe myBusiness WiFi HOTSPOT With Ticketing Bill System

How To Create Wireless ad hoc/Hotspot on your Laptop without any Software on Windows


Supported searches :
◾Free Hotspot
◾Free WiFi Hotspot


MyPublicWiFi: Turn your computer into a WiFi Access Point with Firewall and URL Tracking

MyPublicWiFi is an easy-to-use software that turns your laptop/PC into a Wi-Fi wireless access point. Anyone nearby can surf the Internet through your sharing. This is also an ideal solution for setting up a temporary Access Point in a hotel room,meeting room,at home or the like. The MyPblicWiFi-Firewall can be used to restrict user access to specific servers.


You can also prevent the use of certain Internet services (e.g. file sharing programs). MyPublicWiFi allows you to record and track all visited url pages on your virtual WIFI-Hotspot.


 MyPublicWiFi is a freeware program, and can be fully used.


http://j.gs/844647/mpw


How To Create Wireless ad hoc/Hotspot on your Laptop without any Software on Windows

If you've ever wanted to get your iPod touch, iPhone,Tablet,Smartphone or other wireless device connected, but all you've got is a wired network at work, school, or elsewhere, Windows version 7 and up makes this process.You can also make WiFi Repeater with your Laptop Wireless Connection.


How To Create Adhoc Using Windows Netsh Utility

The Network Shell (netsh) utility is basically developed to let users configure network devices in both client and server editions of Windows. The support for configuring WLAN using netsh was first introduced in Windows Vista, and it’s now available in Windows Server 2008, Windows 7 and Windows 8. Using netsh wlan command, one can easily use hosted network (virtualization  or Microsoft Virtual WiFi Miniport Adapter) feature to create a virtual wireless connection. The Hosted Network is WLAN feature, which is designed to implement virtualization of physical network adapter. Since it plays a vital role in creating a virtual wireless adapter, it’s used by a majority of virtual Wi-Fi hotspot applications, such as Virtual WiFi Router, MyPublicWiFi, Marfi  Connectify etc. So, if your NIC supports wireless hostednetwork / virtualization feature, then you can create an ad hoc wireless connection and turn your PC into Wi-Fi hotspot.


 My connected Device 

OK Lets Start !

1.  RUN CMD as Admin

In order to create an ad hoc connection in Windows 7 or higher version using netsh utility, run CMD with administrative privileges'; just type cmd on Start Screen, right-click it and select Run as administrator.


2. Check if your AdapterNetwork  Interface supported  Virtualization

Now check weather your network interface supports virtualization or not. Simply, run the following command to view Hosted network supported status.If Not supported you just need to update your WiFi Drivers like I just did.
netsh wlan show drivers

3. Allow Ad Hoc

If your NIC supports virtualization, you’re good to go. Now, enter the following commands to configure an ad hoc wireless connection.

netsh wlan set hostednetwork mode=allow ssid=<network name> key=<passkey>
Example:
netsh wlan set hostednetwork mode=allow ssid=adhocBMT key=blogmytuts1


4. Start Ad Hoc

Now, hosted network has been set to allow, you need to start the mode to create an ad hoc connection. Just enter the command below.
netsh wlan start hostednetwork

If “hosted network couldn’t started”, you need to disable current wireless network device and then enable it. You may also need to refresh network adapter list from Device Manger to install a virtual network device driver.

4. Enable ICS for newly created Wi-Fi Connection

To enable ICS ( Internet Connection Sharing )feature, head over to Network and Internet –> Network Connections, and open Properties dialog of network device (which is connected to internet). Now, open Sharing tab, enable Allow other network users to connect through this computer’s Internet connection, and then choose the newly created ad hoc connection from the list. In our case, it’s Wi-Fi 2, as shown in the screenshot below.

Visit http://www.gadget-technolog.blogspot.com/2012/06/using-ics-internet-connection-sharing.html for more info about ICS

a) LAN to Adhoc


b) WiFi to Adhoc

5.Assigned IP address in Adhoc

Now, internet connection is shared, check the IP address assigned to newly created ad hoc connection from TCP/IPv4 Properties. If it doesn’t assign IP address, then run netsh wlan start hostednetwork command in CMD.

You can Assigned Manually  192.168.137.1 Subnet  255.255.255.0 DNS any Public dns.


Now Try to connect your Device!  :)


TIPS:


If you restarted your computer and adhoc didnot work  re enter the command
netsh wlan start hostednetwork
Or create a CMD Batch file copy this on a notepad and save as Enable Hotspot.bat   or Anyname your want then must run with admin.Right click then run as administrator .

start www.gadget-technolog.blogspot.com
netsh wlan start hostednetwork
bmtAdhoc > bmtLOGS.txt


In case your forgot your adhoc password enter this command

netsh wlan show hostednetwork setting=security


If you want to know how many client are connected enter this command
netsh wlan show hostednetwork

Other Command

Show the list of wireless profiles: 
netsh wlan show profiles
Retrieve the stored key (WPA, WEP, etc) of a profile: 
netsh wlan show profiles name=[profile name] key=clear
Delete a wireless profile: 
netsh wlan delete profile name=[profile name]
Set a network’s priority: 
netsh wlan set profileorder name=[profile name]interface=[interface_name] priority=1
Stop automatically connecting to a network: 
netsh wlan set profileparameter name=[profile name] connectionmode=manual
Export a wireless network profile: 
netsh wlan export profile name=[profile name]
Import a network profile:
netsh wlan add profile filename=[path_and_filename.xml] interface=[interface_name]
Disable the Wireless Hosted Network: 
netsh wlan stop hostednetwork

Change the password: 
netsh wlan refresh hostednetwork YourNewNetworkPassword


If your to lazy to do this stuff there is a free software can make it easy :
http://www.gadget-technolog.blogspot.com/2015/05/mypublicwifi-turn-your-computer-into.html


The Dude – MikroTik Automatic Network Discovery & Layout Tool

The Dude network monitor is a new application by MikroTik which can dramatically improve the way you manage your network environment. It will automatically scan all devices within specified subnets, draw and layout a map of your networks, monitor services of your devices and alert you in case some service has problems.


Some of it's features:

  • The Dude is free of charge!
  • Auto network discovery and layout
  • Discovers any type or brand of device
  • Device, Link monitoring, and notifications
  • Includes SVG icons for devices, and supports custom icons and backgrounds
  • Easy installation and usage
  • Allows you to draw your own maps and add custom devices
  • Supports SNMP, ICMP, DNS and TCP monitoring for devices that support it
  • Individual Link usage monitoring and graphs
  • Direct access to remote control tools for device management
  • Supports remote Dude server and local client
  • Runs in Linux Wine environment, MacOS Darwine, and Windows
  • Best price/value ratio compared to other products (free of charge)

 For info visit www.mikrotik.com/thedude

How to create Network Cable (UTP - RJ45)

Creating your own custom-length network cables is quite easy once you have the know-how and the right tools.

 It’s easy to head to the electronics store to buy network cables, making do with cables of predetermined lengths can be a problem. More often than not, premade cables are either too short (and require coupling) or too long (in which case, you have to tie up excess cabling and tuck it away somewhere).

Making network cables takes just a little cutting and crimping, plus a bit of wire arranging.
All of that stuff may sound expensive, but you can find a full network-wiring toolkit--containing the necessary tools, ends for network and phone cables, a cable tester, and some other assorted part.

( Sa CD R-King meron nyan)

Approximately Price:

  1. (LAN) UTP CABLE : 10 to 12 pesos per yard
  2. (LAN) RJ 45 : 7 to 10 pesos each
  3. Crimping Tools : 200 Pesos
  4. Cable Tester : 400 pesos


Here's how to do it.

Wiring Schemes
You'll find a couple of standard wiring schemes and types of network cables. The Telecommunications Industry Association's T568A and T568B standard wiring schemes define the order of the individual wires and pin-outs for eight-pin modular connectors and jacks, such as those used for network cables. Depending on how you wire the cables, you can make “straight-through” or “crossover” cables; I'll give you more details on what those are in just a moment. First, take a look at the following diagrams to figure out how to arrange the wires to make your cable.


Wiring Standards

Pin #    T568B                             T568A
1    White/Orange                  White/Green
2    Orange                                  Green
3    White/Green                    White/Orange
4    Blue                                       Blue
5    White/Blue                       White/Blue
6    Green                                      Orange
7    White/Brown                    White/Brown
8    Brown                                    Brown

 This specification applies to typical twisted pair network cabling including Category 5E (CAT5E) and Category 6 (CAT6).

BLOGMYTUTS TAKE NOTE: Did you know in 8 wires  4 only here are use  PIN 1,2,3,6,
 We have 8 wires because of color coding scheme, we have 4 pairs  1 solid color and 1 with white stripe.
The reason for this is to remember  easily which color and what scheme did you use.

kung nag titipid ka 2 magagawa mo LAN cable sa isang UTP cable gets mo?

PIN 1 is the LEFT side if the cooper pin teeth face you.
Example: T568B


UTP categories available today:

Category 1/2/3/4/5/6 – a specification for the type of copper wire (most telephone and network wire is copper) and jacks. The number (1, 3, 5, etc) refers to the revision of the specification and in practical terms refers to the number of twists inside the wire (or the quality of connection in a jack)


 For most home-networking circumstances, you’ll want to use the T568B wiring scheme and straight-through cables. The network cables currently connecting your broadband modem, router, and PC or media player to your network switch are all straight-through cables. The T568A wiring scheme may be present in some preexisting residential network wiring or other similar projects, but the vast majority of premade network cables available at retail (at least in our experience madalas gamitin kahit yung nabibili ganito sila ) use T568B.

Crossover cables are a different matter. Crossover cables serve only to connect similar devices together, in lieu of a network switch or hub. For example, you can connect two PCs directly to each other to transfer data between them using a crossover cable (ginagamit ko tuwing mag babackup PC to PC ). Years ago, connecting one network switch to another also required a crossover cable, but most modern switches, hubs, routers, and similar devices are now equipped with Auto-MDIX ports that can detect whether a crossover is required and automatically choose the MDI or MDIX configuration necessary to properly connect to whatever device is at the other end of the cable.


I have included the diagrams above to illustrate the different wiring schemes. Inside standard CAT 5, 5e, and 6 cable, you'll find four twisted pairs of wire of varying colors: orange with orange/white, green with green/white, blue with blue/white, and brown with brown/white. You may also see some fibers in the cable that add tensile strength, and that you can cut off when you're crimping on a connector--the fibers don’t carry any electrical signals.

NOTE:
To make a common, straight-through cable, you need to arrange the internal wires and place them into connectors with the same T568B (or T568A) scheme at both ends of the cable.
To make a basic crossover cable, use T568A at one end and T568B at the other.
Or, to make a 1-gigibit-suitable crossover cable, you must cross all four of the pairs.

Crossover Cable:


Prepare the Cable

To make a straight-through network cable (which is what you probably need for home networking), first cut a piece of cable to your desired length; be sure to add a few extra inches, though, because you will be stripping and trimming the ends to fit into the connector. Once you’ve cut the cable, use the blade built into the crimping tool to strip about 1.5 to 2 inches of the cable’s sheath to expose the twisted pairs of wire within. Next, unravel the pairs and straighten them in your fingers. Unravel only the tiny bit of wire that’s exposed, however, as the twists are there to minimize interference.


After straightening the wires, you can arrange them using the desired scheme. We used T568B in the examples here, so we arranged the wires in this order:

  1. Orange/White
  2. Orange
  3. Green/White
  4. Blue
  5. Blue/White
  6. Green
  7. Brown/White
  8. Brown

Note that pin 1 in an RJ45 connector is at the far left, when the connector’s contacts are facing up and away from you.

Make the Connections
When you have arranged the wires in the proper order, hold them tightly in your fingers and then feed the loose ends into your cutting/crimping tool. You’ll want to cut the ends perfectly straight, leaving about a half-inch exposed from the cable sheath.


Then, simply feed the wire into the RJ45 connector, with the connector’s contacts facing upward. Once you get the hang of it, you’ll find that you can use the top, inner surface of the connector as a guide when you're feeding the wires in. Push each wire in firmly so that it reaches all the way to the top of the connector. About a quarter-inch of cable sheath should also make its way into the end of the connector, where you will crimp it to hold it firmly in place.


After you have pushed the cable all the way into the connector, perform a quick visual inspection to confirm that the wires remained in the correct order. Then insert the connector into your crimping tool, and give it a firm squeeze. Repeat the process on the other end of the cable, and you’ve just made your first straight-through network cable. Next, plug it into the tester, making sure that you have continuity and that the wires are in the correct arrangement. If the cable passes the test, it’s ready to use.

Once you've inserted the cable, closely inspect the wire arrangement and crimp the connector in place.


Congratulations, you've mastered the art of making your own network cables! While you have your tools and equipment out  check your Cable if they properly crimp using Cable Tester.
It should blink same from 1 to 6  that means you crimp it right. Pin 4,5,7 and 8 are optional no need .
If you use crossover LED blink 1 and 6 , 2 and 3.

NOTE FOR CCNA
straight -  ( UNLIKE  Device Type  or 2  Not Similar Device)
example: router and a switch , pc to router ,

cross over - ( LIKE Device Type or  2 Similar Device )
example: router to router, pc to pc, hub to hub


Older Post ►
 

Copyright 2011 Gadgets Technology is proudly powered by blogger.com